Windows 11 keeps two proxy settings, and plenty of programs read neither. The one in Settings reaches your browsers; a second, machine-wide one serves Windows Update and the Store; and PowerShell 7 and curl look at environment variables before either. Set the proxy where your program looks, then check it.
What follows comes from Microsoft's documentation, from the source code of Chromium (the engine of Edge and Chrome), Firefox and WSL, from a real capture of the Settings window, and from one test on our own Windows 11 machine on 3 October 2026. That test changed nothing on the machine: it read both settings and set a proxy variable inside one PowerShell window only.
| Where you set it | What it reaches | What it leaves out |
|---|---|---|
| Settings, Network & internet, Proxy | Edge, Chrome, Firefox on its default, Windows PowerShell 5.1 | VPN connections, Windows Update, programs that read variables |
| Proxy settings for one VPN connection | That VPN connection | Wi-Fi and Ethernet |
netsh winhttp (machine-wide) | Windows Update, the Microsoft Store, services | Your browser |
HTTP_PROXY and HTTPS_PROXY | PowerShell 7 and .NET apps, curl.exe | Edge, Chrome, Windows PowerShell 5.1 |
| The program's own setting | Only that program | Everything else |
Follow the Settings proxy
Edge and Chrome
read Windows' setting through Chromium
Firefox
its default is use system proxy settings
Windows PowerShell 5.1
.NET Framework reads the Internet options
WSL
copies it; a localhost proxy only in mirrored mode
Read something else
PowerShell 7 and .NET apps
HTTP_PROXY and HTTPS_PROXY first
curl.exe
proxy variables only
Windows Update, Store, services
the machine-wide WinHTTP proxy first
Many games and tools
their own setting, or none
Before you start: what you should have
A proxy is two pieces of information, and sometimes four:
- The address. An IP like
203.0.113.10or a host name likegate.example.com. - The port. A number such as 8080 or 3128.
- A user name and password, if the proxy needs a login. Step 4 explains where they go, because Windows itself has no place for them.
A paid proxy usually arrives with all four joined together:
Where each part of a proxy line goes on Windows
203.0.113.10Host:8080Port:hp_ir4k2Username:9fa2c1PasswordHost goes in Proxy IP address and the port in Port. The user name and password go into the browser's login window, not into Settings. Values shown are examples.
If your line looks different, the proxy format guide breaks down every shape a provider might send. For a first test, any HTTP entry from our free proxy list will do. Free entries come and go, so test one first; the check further down shows how.
Our free proxy setup generator does the typing for you: paste the line and it fills in every value on this page for your own proxy, from the two boxes in Settings to the netsh and PowerShell lines further down, without the line leaving your browser.
Step 1: open the proxy page
Press the Windows key, type proxy and open Change proxy settings. Or click through it: Settings, then Network & internet, then Proxy. The page says at the top that its settings apply to Ethernet and Wi-Fi connections and not to VPN connections; a VPN has its own proxy, further down this page.
Step 2: open the Edit proxy server window
Under Manual proxy setup, select Set up next to Use a proxy server. Once a proxy has been saved, the same button reads Edit.
Step 3: fill in the address and the port
- Switch Use a proxy server on.
- In Proxy IP address, type the address or host name on its own, with no
http://in front:203.0.113.10. - In Port, type the port on its own:
8080. - In the box below, list the sites that should skip the proxy, by the end of their address, separated by semicolons, for example
*.contoso.com; *.adatum.com. Leave it empty if you have none. - Decide on Don't use the proxy server for local (intranet) addresses (below), then select Save.
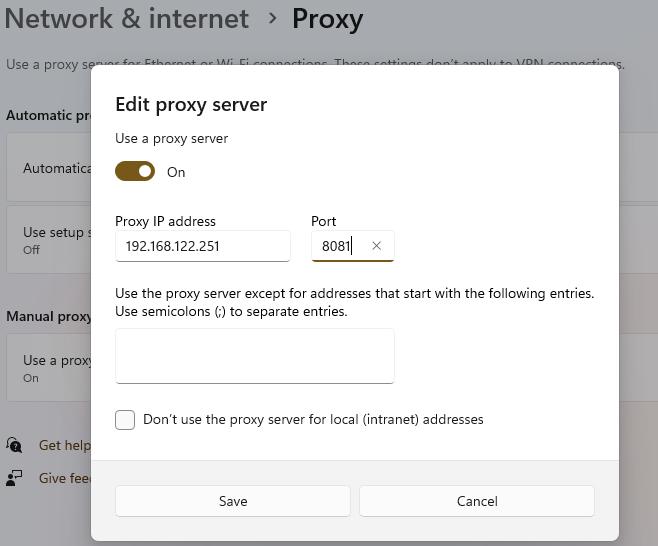
The checkbox is easy to misread. Microsoft recommends ticking it, and Chromium's documentation, which Edge and Chrome follow, defines what it does: it bypasses host names without a dot, such as printer or intranet, and not IP addresses. So 192.168.1.10 still goes through the proxy. To keep local addresses off it, add them to the exceptions box, for example 192.168.*.
The setting takes effect at once; there is nothing to restart.
Step 4: the user name and password
The Edit proxy server window has no fields for a login, as the capture shows, and neither does the machine-wide proxy in step 6. Windows leaves the login to each program:
- Edge and Chrome ask when they first use the proxy, in a window that reads "The proxy 203.0.113.10:8080 requires a username and password." For a plain HTTP proxy it adds "Your connection to this site is not private", because the login travels to the proxy unencrypted.
- A program that cannot ask, a service, a scheduled task, a scraper, will fail instead. The clean answer is an address allowlist at the provider, so the proxy accepts your IP without a login. The accepted answer on Super User's question about this (72,761 views) suggests a small local relay proxy instead, which holds the login for Windows.
When your proxy needs a password and your software cannot send one covers those ways in detail.
Step 5: which programs actually follow it
Most guides stop at step 3 and promise that "all apps" now use the proxy. They do not, and the rule is not obvious, so we measured it on our Windows 11 machine. Both proxies were off; then one PowerShell window got HTTPS_PROXY set to a documentation address, and we asked three tools which proxy they would use:
Which proxy each program on Windows 11 uses
| Program | Proxy it uses | Where that is documented |
|---|---|---|
| Edge, Chrome | The Settings proxy | Chromium's proxy documentation |
| Firefox | The Settings proxy, until you change its own Network Settings | Firefox's default, network.proxy.type 5 |
| Windows PowerShell 5.1 | The Settings proxy; it ignores HTTPS_PROXY | .NET Framework's DefaultWebProxy, and our test |
| PowerShell 7, .NET apps | HTTP_PROXY and HTTPS_PROXY first, the Settings proxy only when they are unset | .NET's HttpClient.DefaultProxy, and our test |
| curl.exe (Windows ships 8.21 on our build) | The proxy variables, never the Settings proxy | curl's manual, and our test |
| Windows Update, Store, services | The machine-wide WinHTTP proxy first (step 6) | Microsoft's Windows Update proxy page |
| WSL | A copy of the Settings proxy (below) | Microsoft's WSL documentation |
Microsoft Learn, Chromium and Firefox source, curl's manual; our Windows 11 test, 3 October 2026
So a forgotten HTTPS_PROXY in your user variables sends PowerShell 7 and curl to that proxy whatever Settings says, and a script that works in one PowerShell can go direct in the other.
Step 6: the machine-wide proxy, for Windows Update, the Store and services
Windows Update reads its own proxy first. Microsoft states that it tries the system proxy (WinHTTP) and turns to your Settings proxy only when it hits certain proxy, service or authentication errors:
WinHTTP, the machine-wide proxy
set with netsh, or found through WPAD
Certain proxy, service or login errors?
only then does it go on
The Settings proxy
the signed-in user's Internet options
Open Terminal (Admin) or an administrator command prompt and read the current state:
netsh winhttp show advproxy
To copy what you set in step 3 into it:
netsh winhttp import proxy source=ie
Or set it directly with the form Microsoft now documents, a scope and a JSON object:
netsh winhttp set advproxy setting-scope=machine settings="{\"Proxy\":\"203.0.113.10:8080\",\"ProxyBypass\":\"localhost;*.local\",\"AutoconfigUrl\":\"\",\"AutoDetect\":false}"
Most guides still print netsh winhttp set proxy and show proxy. Both run, but Microsoft's reference marks both as deprecated. The JSON has no place for a login either, so a proxy that demands one makes Windows Update fail with 0x8024401B; give the machine an allowlisted address, or leave the update traffic direct. Without administrator rights, netsh answers Error writing proxy settings. (5) Access is denied.
VPN connections
A VPN connection ignores the proxy page. Each VPN keeps its own: Settings, Network & internet, VPN, select the connection, Advanced options, then Edit next to Proxy settings for this VPN connection, and Apply.
SOCKS5
Windows cannot carry a SOCKS5 proxy system-wide. Microsoft's comparison of its two HTTP stacks shows WinINet, the one behind Settings, supporting SOCKS4 (not even 4a) and not SOCKS5, and WinHTTP supporting neither; netsh winhttp set advproxy states that SOCKS5 is not supported. The old Internet Options, LAN settings, Advanced dialog does have a Socks field, but Chromium's documentation is clear that Edge and Chrome read it as SOCKS version 4, so a SOCKS5-only proxy fails there. Set a SOCKS5 proxy inside the program that speaks it.
WSL
On Windows 11 22H2 and later, WSL copies Windows' HTTP proxy into Linux by default (autoProxy=true in .wslconfig). Two of its messages come up with proxies:
An Http Proxy change has been detected on the host. Please restart WSL to apply the change.Runwsl --shutdownand start the distribution again.A localhost proxy configuration was detected but not mirrored into WSL. WSL in NAT mode does not support localhost proxies.Your Windows proxy sits on127.0.0.1. WSL's default NAT mode cannot reach it under that name; withnetworkingMode=mirroredunder[wsl2]in.wslconfig, Windows and WSL reach each other throughlocalhost.
Inside WSL, Linux's rules apply; our Linux guide covers them.
Check that it worked
Open this address in Edge or Chrome, which use the Settings proxy:
https://www.cloudflare.com/cdn-cgi/trace
The line starting with ip= is the address sites see. If it is the proxy's address, your browsing goes through the proxy. Then open https://hproxy.com/api/ip/ followed by that address: it names the country, city and network behind it. From PowerShell, (Invoke-RestMethod https://www.cloudflare.com/cdn-cgi/trace) -split '\n' -match '^ip=' does the same for PowerShell's own proxy. Do not test with curl.exe alone: it ignores the Settings proxy and shows your own address.
Two more readings, in any terminal:
reg query "HKCU\Software\Microsoft\Windows\CurrentVersion\Internet Settings" /v ProxyServer
netsh winhttp show advproxy
The first shows the Settings proxy, the second the machine-wide one. Before you rely on a proxy, paste it into our free proxy checker, which reports whether it answers, its protocols, anonymity, country and latency. Free entries come and go; for work that has to finish, a paid proxy can keep one address for a sticky session.
When it does not work: the messages
Windows 11 proxy messages, what they mean, and the fix
| What you see | What it means | Fix |
|---|---|---|
There is something wrong with the proxy server, or the address is incorrect. with ERR_PROXY_CONNECTION_FAILED (Edge, Chrome) | Nothing answers at the proxy address and port. | Switch the proxy off, check the address and port, test the proxy, switch it on again. |
ERR_TUNNEL_CONNECTION_FAILED | The tunnel through the proxy to the site could not be set up. | Check the login, and that the proxy allows that site and port. |
The proxy ... requires a username and password. | The proxy wants a login. | Type it in; for programs that cannot, use an address allowlist. |
ERR_PROXY_AUTH_UNSUPPORTED | The proxy asked for a login method the browser does not support. | Ask the provider for basic login or an allowlist. |
Windows Update 0x8024401B | Same as HTTP 407: the proxy wants a login that WinHTTP cannot send. | Allowlist the machine's address, or let updates go direct. |
Windows Update 0x80244021 | Same as HTTP 502: the proxy got a bad answer from upstream. | Check the machine-wide proxy with netsh winhttp show advproxy. |
Error writing proxy settings. (5) Access is denied. | A netsh winhttp change ran without administrator rights. | Run it from Terminal (Admin). |
A localhost proxy configuration was detected but not mirrored into WSL. | WSL in NAT mode cannot use a proxy on 127.0.0.1. | networkingMode=mirrored in .wslconfig, or a proxy on a real address. |
Chromium source (net_error_list.h, error page and login strings); Microsoft Learn (Windows Update error codes); WSL source; Super User question 1684628
One more after a fix: Edge and Chrome remember a proxy that failed as bad and skip it for a while. Opening edge://net-internals/#proxy (or chrome://net-internals/#proxy) and pressing Clear bad proxies makes them try it again; Re-apply settings reads Windows' setting again. And if Windows says it could not automatically detect the proxy settings, that is about automatic detection, not the address you typed: the page on that message explains it.
Mistakes other guides make
- A password box in Windows' proxy settings. There is none, in Settings or in netsh. The browser asks.
- "Firefox ignores the Windows proxy." Its default follows Windows.
netsh winhttp set proxyfor command line tools. It sets only the machine-wide proxy, Microsoft marks it deprecated, and curl and PowerShell 7 read variables.- SOCKS through the Internet Options Socks field. Edge and Chrome read it as SOCKS4, so a SOCKS5 proxy fails.
- The local-address box for LAN addresses. It covers names without a dot only.
netsh winhttp show proxyas the proxy check. It is deprecated, and it shows only the machine-wide side, not what Settings holds.
Turning it off again
- Settings, Network & internet, Proxy, Edit next to Use a proxy server: switch it off and Save.
- If you set the machine-wide proxy:
netsh winhttp reset proxyin an administrator window, which returns it to DIRECT. - If you set proxy variables: remove
HTTP_PROXYandHTTPS_PROXYunder Environment Variables, and open a new window.
On Windows 10
The same values, one screen earlier: Windows 10 shows the address and port on the Proxy page itself instead of behind an Edit button. Our Windows 10 guide walks through that layout; from step 5 on, everything here applies to both.
How we wrote this
We read Microsoft's support page for the proxy settings and Microsoft Learn's pages on WinINet and WinHTTP, netsh, Windows Update's choice of proxy and its error codes, .NET's two default proxies and WSL. For Edge and Chrome we read Chromium's proxy documentation, its error list and its error and login texts; for Firefox, its default preference; for curl, its manual. The capture of the Edit proxy server window is our own.
On 3 October 2026 we ran one test on our Windows 11 machine, build 26200.9550: we read both proxy settings, set HTTPS_PROXY inside one PowerShell 7 window, and asked .NET, Windows PowerShell 5.1 and curl.exe which proxy they would use. We did not change Windows' proxy settings, because the machine is in daily use; the Settings steps rest on Microsoft's page and our capture. Real questions came from Super User and from Google's suggestions.
Sources
All read on 3 October 2026.
- Use a proxy server in Windows (Microsoft Support).
- WinINet vs. WinHTTP; Netsh.exe commands for WinHTTP; How the Windows Update client determines which proxy server to use; Windows Update error code list by component (Microsoft Learn).
- HttpClient.DefaultProxy (.NET) and WebRequest.DefaultWebProxy (.NET Framework 4.8.1) (Microsoft Learn).
- WSL networking and .wslconfig settings (Microsoft Learn); WSL's message strings (github.com/microsoft/WSL).
- Chromium: net/docs/proxy.md, net_error_list.h, the error page and login strings, the net-internals proxy page (chromium.googlesource.com).
- Firefox: StaticPrefList.yaml, network.proxy.type (github.com/mozilla-firefox).
- The curl man page (curl.se).
- Super User questions 346372, 29701, 419696, 979727 and 1684628.
- Our test on our Windows 11 workstation, 3 October 2026, and our capture of the Edit proxy server window.