On Kali, a proxy usually does not mean a system setting. It means one command going through one proxy while everything else carries on as before, which is what proxychains does. This page covers that, the apt setting that package downloads read, and the desktop setting that covers only desktop apps.
The generic terminal variables, http_proxy and friends, are the same here as on any Debian based system, so they stay on the Linux page. What follows is what differs on Kali.
What we ran and what we did not: the entries below were tested with curl on our own Debian based server, and proxychains was not run here, because we do not install it on this machine. Everything about proxychains on this page comes from its own manual and is marked where it does.
What you need before you start
- The proxy as a type, an address and a port, for example
socks5 198.51.100.10 1080. If your provider sent one long line, the proxy format guide splits it. - proxychains, from Kali's own repository:
sudo apt install proxychains4. - For a first test, entries from our free proxy list. Expect some to be dead: that is measured below.
Step 1: know which file proxychains reads
This is where most attempts fail. The manual gives five locations, in order:
- the file named by the
PROXYCHAINS_CONF_FILEvariable, or by-f ./proxychains.confin the directory you are standing in~/.proxychains/proxychains.conf/etc/proxychains.conf/etc/proxychains4.conf
The first one found wins. A guide that tells you to edit /etc/proxychains.conf while a file sits in your current directory is a guide that will not work for you.
Step 2: choose the chain mode
Near the top of that file sit three modes, and exactly one should be uncommented:
- dynamic, which skips proxies that do not answer and keeps going
- strict, which uses every listed proxy in order and fails if one is down
- random, which takes entries from the list at random
With paid entries the modes are a preference. With free entries they decide whether the command runs at all: in our own test with curl on 16 September 2026, four of six SOCKS5 entries from our public list carried a request and two answered nothing.
Step 3: list the proxy and run one command
At the end of the file, one line per proxy: the type, the address, the port, and a user name and password if the proxy needs them. Then put proxychains4 in front of whatever you want to send through it:
proxychains4 curl -s https://www.cloudflare.com/cdn-cgi/trace
The manual's own example has the same shape, proxychains telnet targethost.com, with -f to point at another config file. Note what the tool does and does not do: it hooks the network functions of a dynamically linked program and redirects its connections through SOCKS4a, SOCKS5 or HTTP proxies, and it carries TCP only, with no UDP and no ICMP. It adds no encryption.
Step 4: the same thing without proxychains
One proxy for one command needs no wrapper at all, which is also how we measured it:
curl -s --socks5-hostname 198.51.100.10:1080 https://www.cloudflare.com/cdn-cgi/trace
The --socks5-hostname form resolves the name at the proxy rather than on your machine, which is the same idea as the proxy_dns setting in the proxychains config.
Step 5: apt needs its own setting
Package downloads read neither your shell nor your desktop. Write the option apt reads into a fragment, so an upgrade leaves it alone:
echo 'Acquire::http::Proxy "http://198.51.100.10:8080/";' | sudo tee /etc/apt/apt.conf.d/99proxy
The form is scheme://[[user][:pass]@]host[:port]/, a per-host variant exists as Acquire::http::Proxy::deb.debian.org, and the value DIRECT means no proxy for that host.
Where each setting reaches
| What you set | What goes through the proxy | What does not |
|---|---|---|
proxychains4 in front of a command | that one command | everything else |
| Shell variables in one terminal | tools that read them, in that terminal | other terminals, anything under sudo |
A fragment in /etc/apt/apt.conf.d/ | apt, including under sudo | everything that is not apt |
| The desktop network settings | desktop applications | the terminal, apt, services |
Check that it worked
Run the command above and read the ip= line. If it is the proxy, the traffic went through it. In our own run, four entries carried the request and the site saw the proxy: two exits in France, one in the United Kingdom, one in Germany. One of the four answered from a different address than the one on the list, which is ordinary for a rotating free entry.
Our free proxy checker does the same for a whole list and adds the protocol, the grade, the country, the network and the latency.
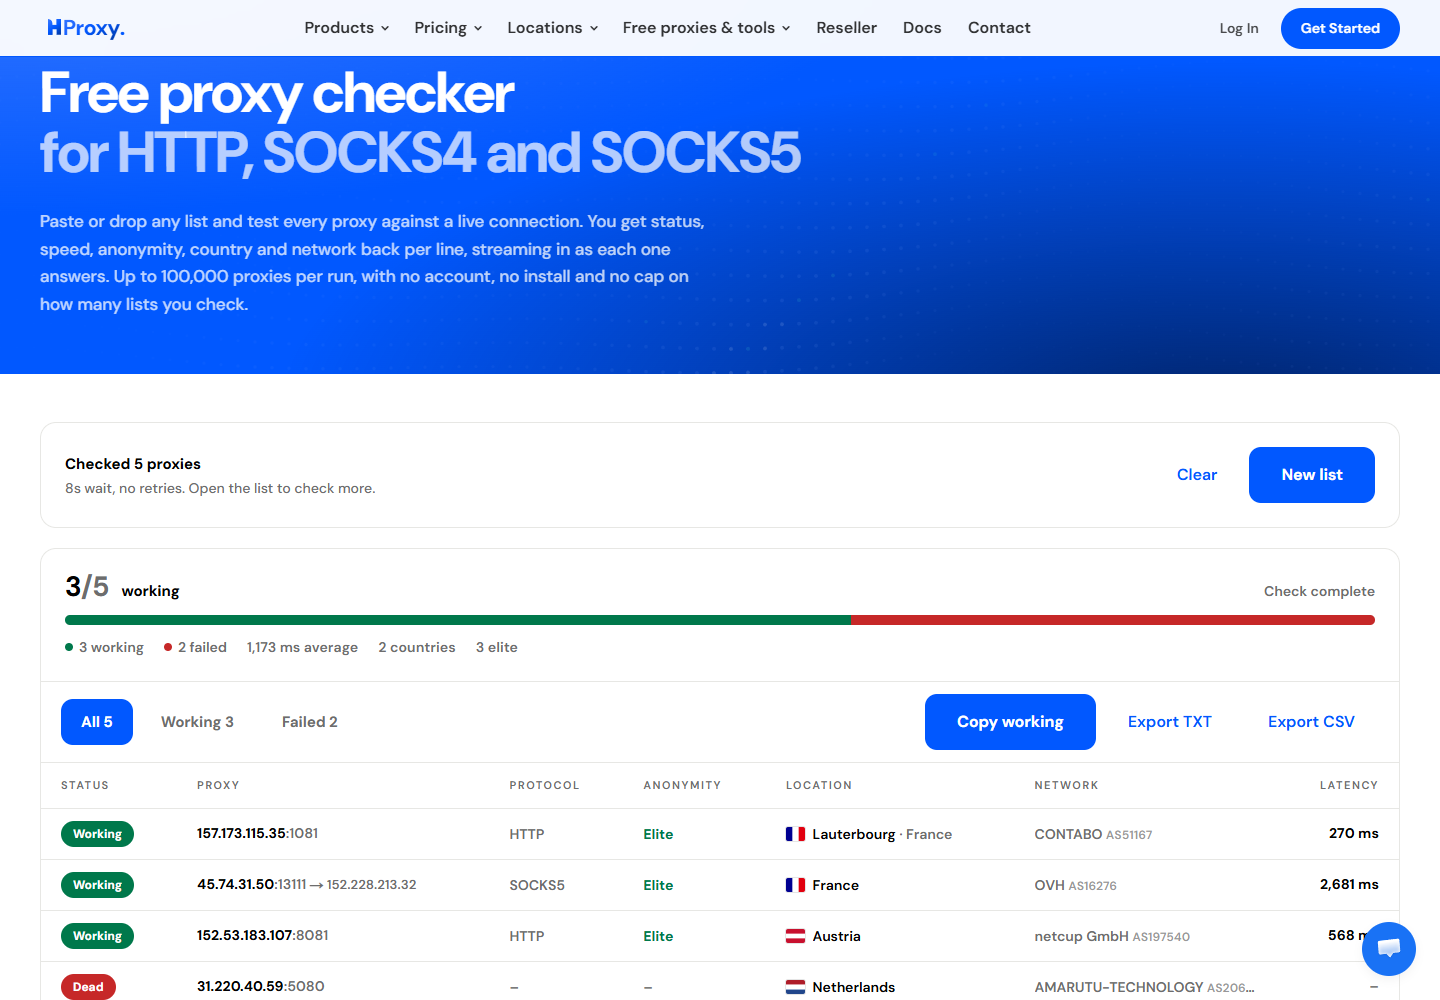
Two of five dead, and an average above a second, is the normal state of a public list. When a scan has to finish rather than merely start, a paid proxy is the part that stops changing under you.
When it does not work
- The config seems ignored. You edited a file further down the list than the one proxychains found. Check for a
proxychains.confin your current directory. - Everything fails with a strict chain. One entry in the chain is down. Switch to dynamic while testing.
- A browser will not take your SOCKS5 login. Chrome implements no authentication for SOCKSv5, so that entry belongs in a terminal tool instead.
- apt still goes direct. It reads its own option; see step 5.
- Names resolve but nothing connects. Use the
socks5hform orproxy_dnsso lookups happen at the proxy.
Turning it off again
Comment the proxy lines out of the proxychains config, delete /etc/apt/apt.conf.d/99proxy, and set the desktop back to no proxy. Each of the three is independent, and a forgotten one keeps sending traffic somewhere you no longer control.